Informatica Certification Training Course
- 22k Enrolled Learners
- Weekend/Weekday
- Live Class
In today’s data-driven world a huge amount of data is generated from various organizations, machines, and gadgets, irrespective of their sizes. For example, your mobile, each time you browse the web, some amount of data is generated. Do you know a commercial plane can generate up to 500GB of data per hour? I hope now you can imagine how large this data is! This is the reason it is known as Big Data. But all of this data is pretty much useless unless you perform ETL operations on it! Believe me, it’s certainly not an easy task. Moreover, today’s real-time and fast-paced nature of the business, adds to the need of having such a tool which can quickly and easily integrate the systems. Well, this is where Talend comes to the rescue. Through this blog on Talend Tutorial, I will explain how Talend helps to build, test, deploy, schedule and monitor this data.
But before I proceed, let me list down the topics I will be discussing today:
You may also go through this recording of Talend Data Integration Tutorial where our experts have explained the topics in a detailed manner with examples.
Talend is an open source software integration platform/vendor which offers data integration and data management solutions. This company provides various integration software and services for big data, cloud storage, data integration, data management, master data management, data quality, data preparation, and enterprise applications. Its headquarters are located in Redwood City, California.
Following are the some of the major features of Talend:

It is considered to be the next-generation leader in cloud and big data integration software. It provides the software that helps companies become data driven by making data more accessible, improving its quality and quickly moving it where it’s needed for real-time decision making. You can think Talend as a critical infrastructure for this data-driven world. It’s an open source approach which breaks off the traditional proprietary model by providing the powerful software solutions. It enables the flexibility to meet the needs of all the organizations. Being open source, it is backed by a huge community of the developers. Talend publishes its core module’s codes under the GNU Public License or the Apache License. From here, the developers within the community can make changes and enhance the products which in turn will benefit other Talend users.
Various products offered by Talend are:
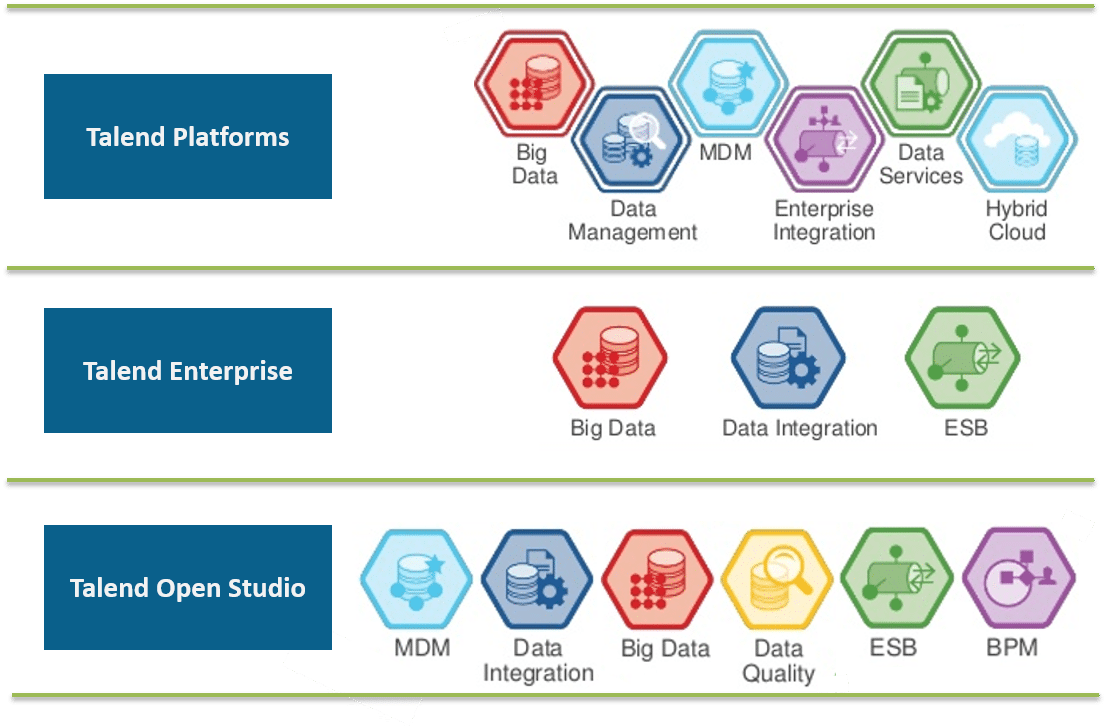
Among all the above-shown products, Talend Open Studio (TOS) is the main and majorly used. In this Talend tutorial blog, I will be explaining how you can use Talend Open Studio for Data Integration.
Talend Open Studio is an open source project that is based on Eclipse RCP. It supports ETL oriented implementations and is generally provided for the on-premises deployment. It is extensively used for integration between operational systems, ETL processes and data migration. Talend Open Studio for Data Integration is designed in such a way that it can easily combine, convert and update data present at various locations across an organization. This acts as a code generator which produces data transformation scripts and underlying programs in Java. It provides an interactive and user-friendly GUI which lets you access metadata repository containing the definition and configurations for each process performed in Talend. Below is the basic architecture of Talend Open Studio.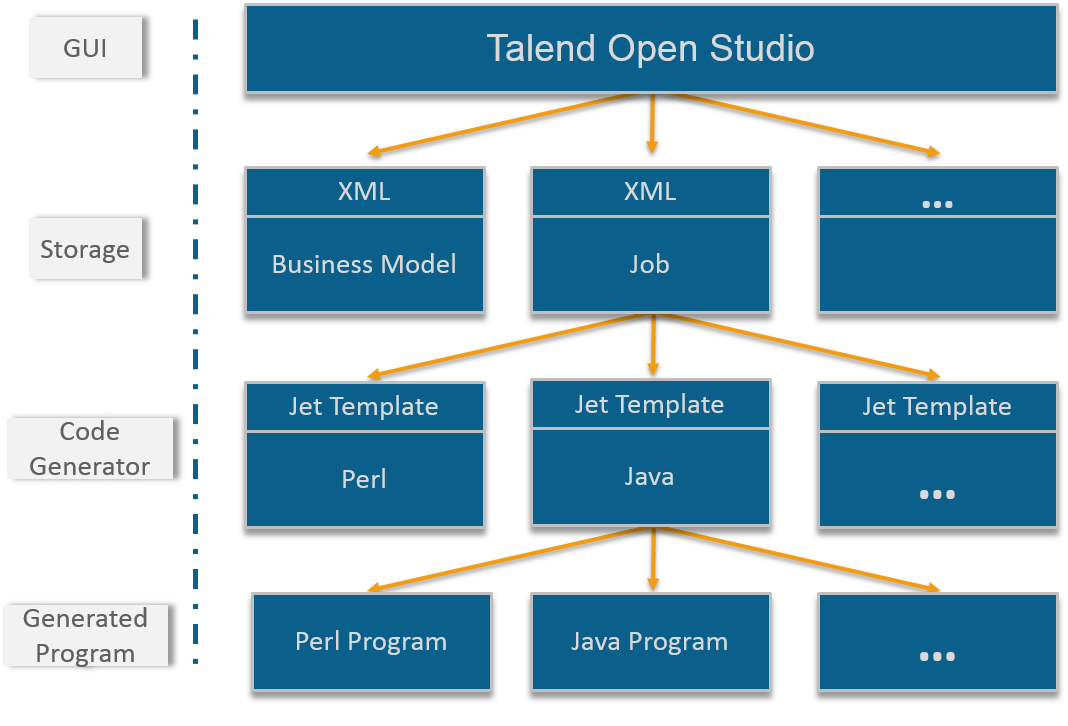
Lets now try to download and install Talend Open Studio on CentOS.
STEP 1: Go to: https://www.talend.com/download.
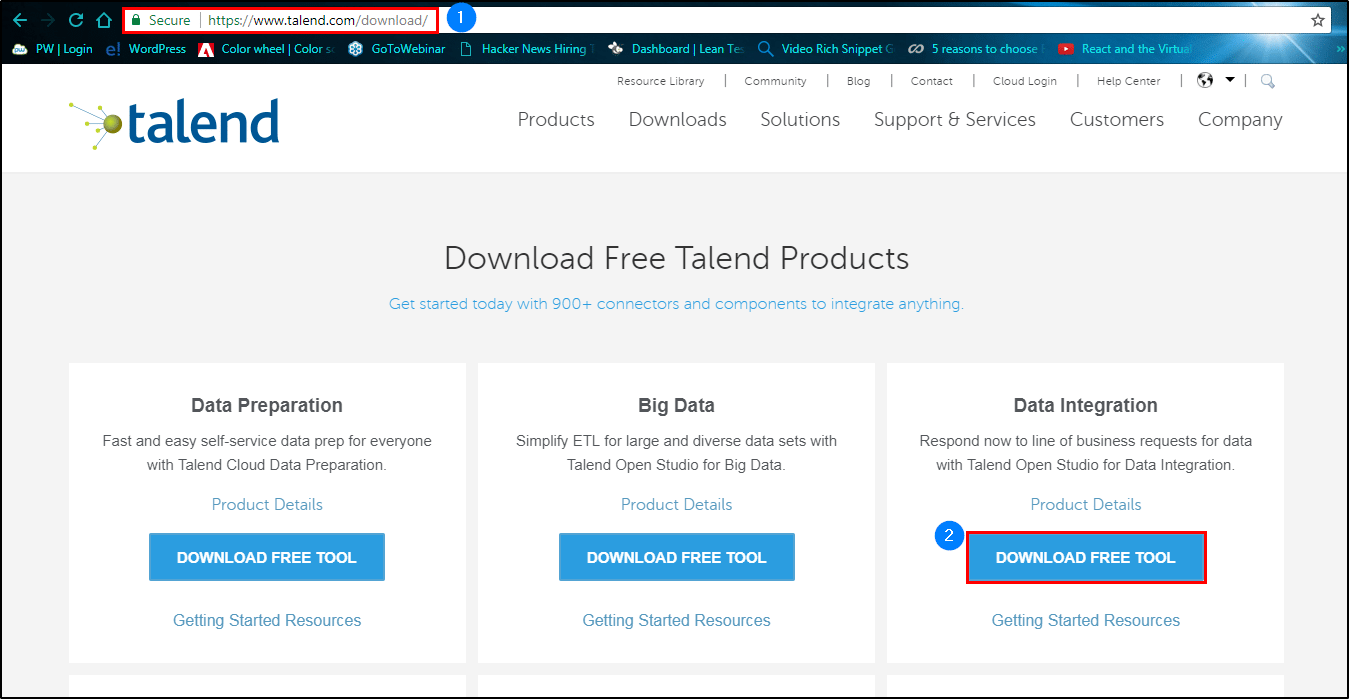 STEP 2: Click on ‘Download Free Tool’.
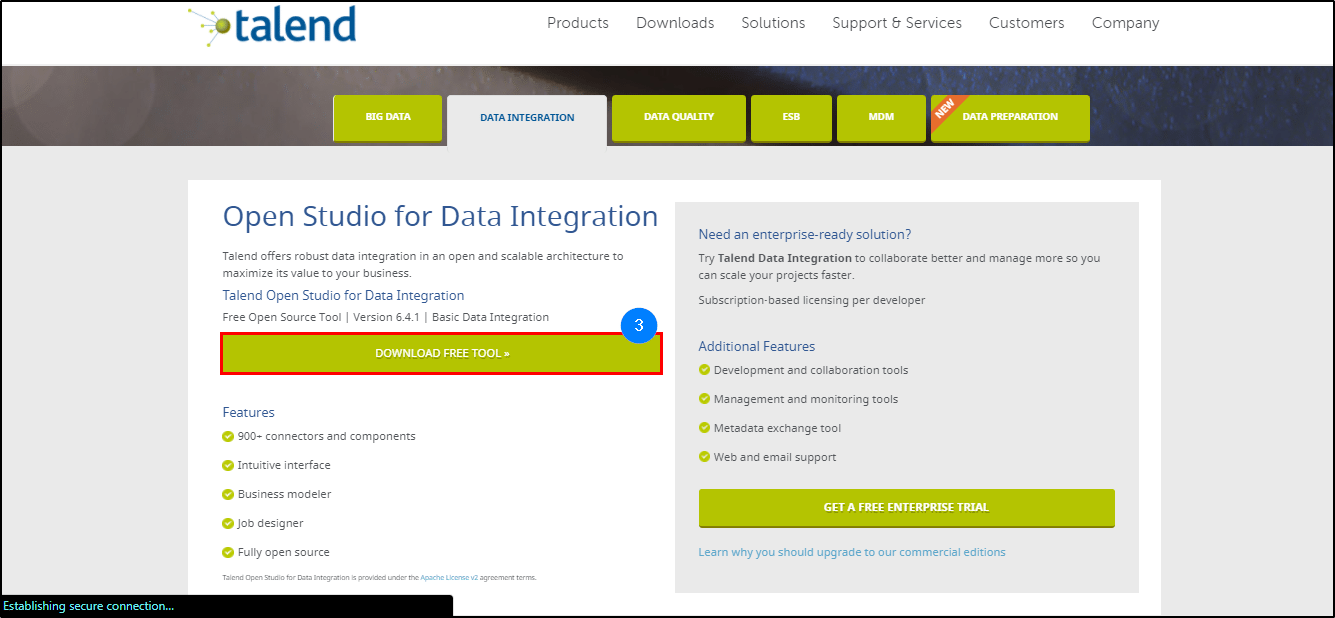
STEP 3: Again click on ‘Download Free Tool’ to get the zip file.
STEP 4: Now extract the zip file.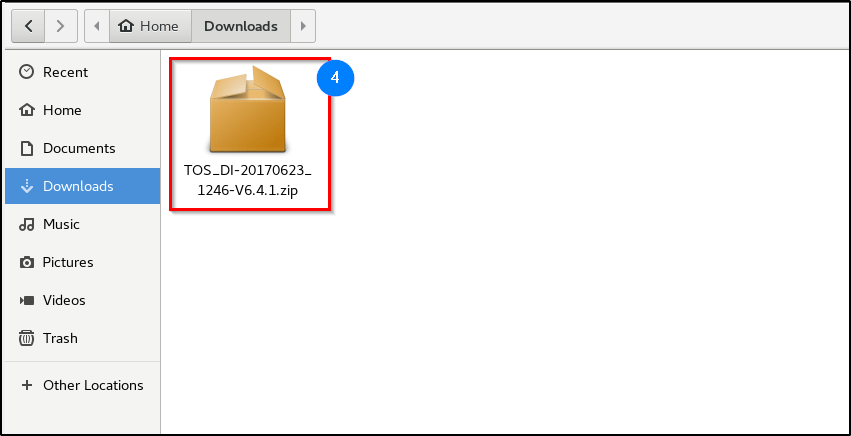
STEP 5: Now go into the extracted folder and double click on TOS_DI-linux-gtk-x86_64 file.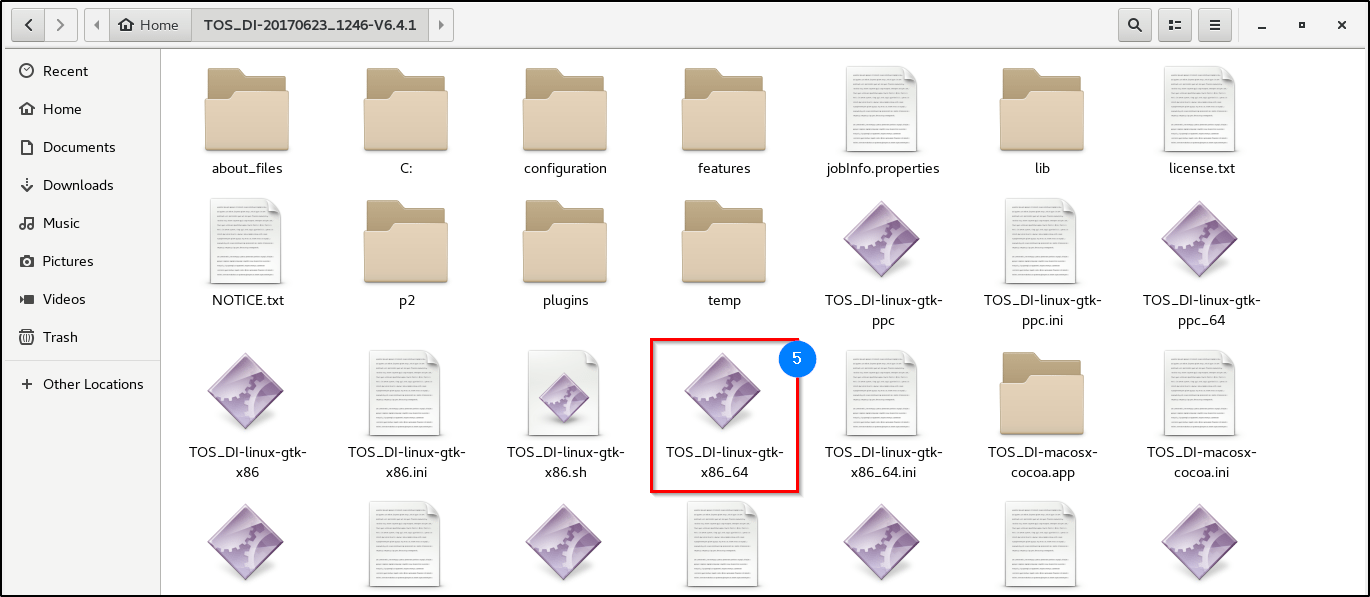
STEP 6: Let the installation finish.
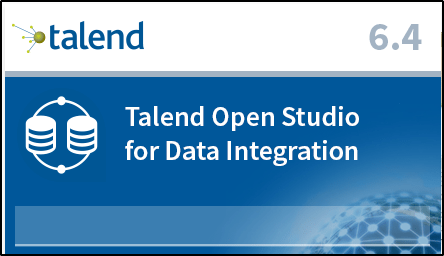 STEP 7: Click on ‘Create a new project’ and specify a meaningful name for your project.
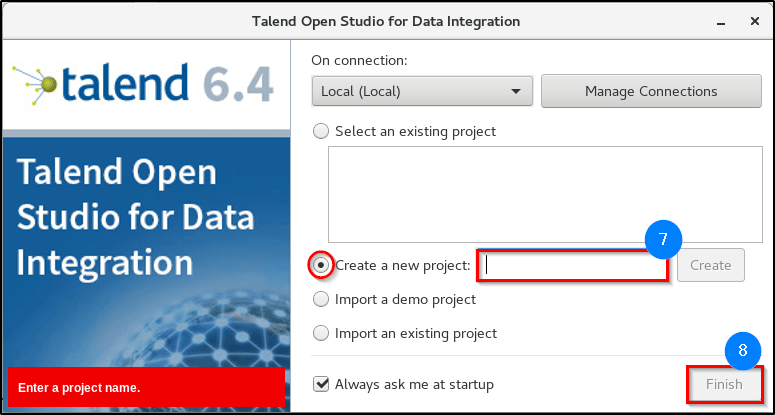 STEP 8: Click on ‘Finish’ to go to the Open Studio GUI.
STEP 9: Right-click on the Welcome tab and select ‘Close’.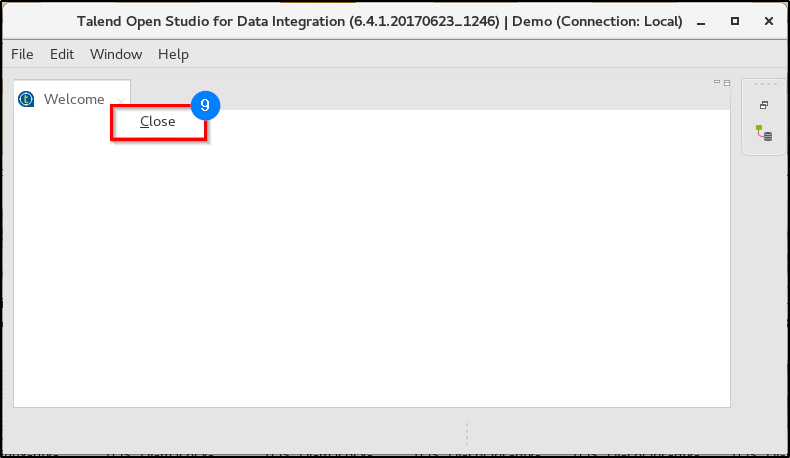
STEP 10: Now you should be able to see the TOS main page.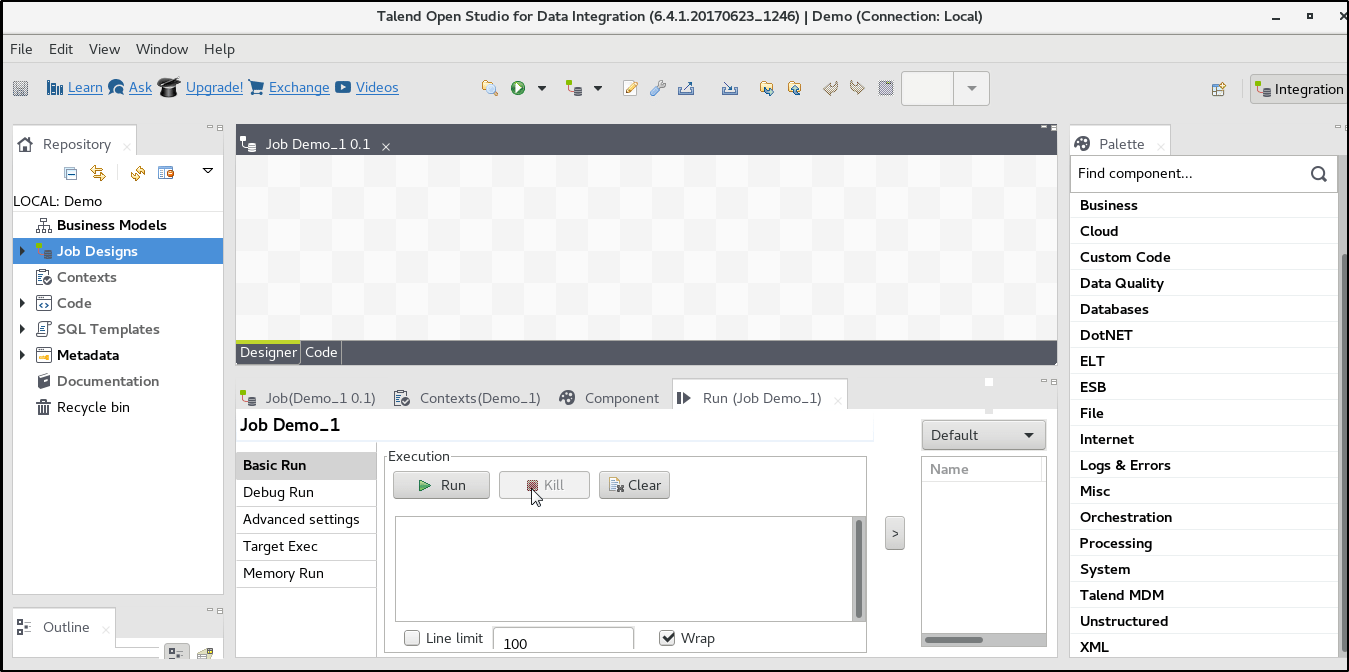
Now that you have downloaded and installed Talend Open Studio, let me give you a walkthrough of its GUI. Talend Open Studio consists of four major parts, as shown below.
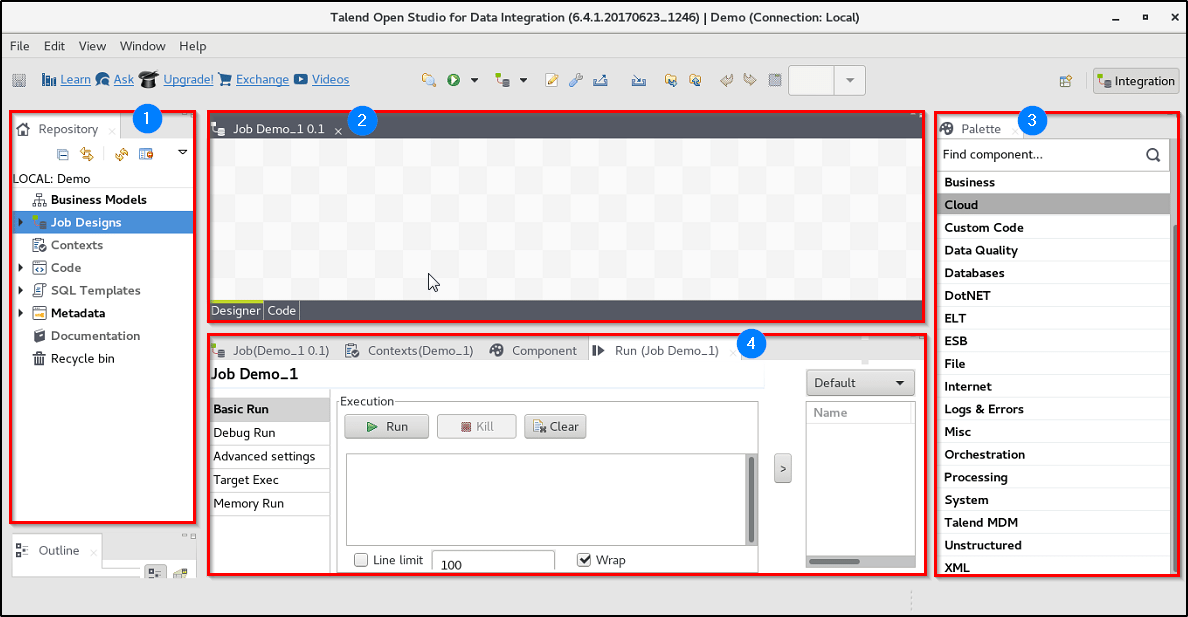
The Repository collects all the technical items which can be used either to describe business models or design Jobs within Talend and displays them in a tree structure. From the Repository, you can access various Business Models, Job Designs, reusable routines, documentation as well as database connections. In other words, the Repository acts as a central store for all the elements which are necessary for any Job design or business modelling within a project.
This window further consists of the following parts:
Component Palette is docked at the top of the design workspace to help you draw the model corresponding to your workflow needs. Depending on your Job or the business model, you can drag and drop various technical components or shapes into your design workspace. There are more than 800 components available for you to choose from.
The configuration tabs are present in the lower half of the design window. There are various configurational tabs available in TOS. Each of these tabs opens a view which displays the properties of the current element in the workspace. Most frequently used configurational tabs are:
The Job tab provides various information about the current Job in the designer window including name, version, creation date and time etc.
The Context tab is used to set context variables and different contexts on which they will be used.
The Component tab displays all the parameters that are required to configure a component. Basically, it collects all the information that is relative to the graphical element selected in the design workspace.
The Run tab displays the progress of the execution of a Job. The logs shown here includes any start, end and error messages.
Here you might ask ‘what is a Job’, as I have already used this term quite a few times till now. So, before diving any deeper let me first give you a brief about a Talend Job.
A ‘Job’ in Talend is basically a customer requirement converted into a technical process. Technically, it is a basic executable unit of any process that is built using Talend. As you already know, TOS converts everything into Java codes at the backend. In case of Jobs, each Job is converted into a single Java class. Let me show you how you can create a Job in Talend.


But in order to add a component to a Job, first, you need to know what exactly are components, how you can use multiple components together and connect them. So in the next part of this Talend tutorial, I will introduce you to various components and connectors available in Talend.
Let’s start with Components.
A component is a functional piece which is used to perform a single operation in Talend. On the palette, whatever you can see all are the graphical representation of the components. You can use them with a simple drag and drop. At the backend, a component is a snippet of Java code that is generated as a part of a Job (which is basically Java class). These Java codes are automatically compiled when the Job is saved. A Talend Job may include one or more components depending on the requirement. One thing you need to know here is Talend provides more than 800 components from which you can choose from. For the ease of access, all these components are generalized to few groups or families. In this Talend tutorial blog, I will introduce you to some of the most important and frequently used components of each family.
This family provides Talend components which cover various needs like opening connections, reading and writing tables, committing transactions, performing rollback for error handling etc. More than 40 RDBMS are supported by Talend some of which are MySQL, MS SQL Server, Hive, Amazon, Azure etc. Following are some of the majorly used MySQL components:
This family groups together various components which read and write data in all types of files like Delimited, Positional, XML, Excel etc. Moreover, it also provides a number of components which help in performing various tasks like unarchiving, deleting, copying, comparing etc. This family is further divided into subfamilies like Input, Output, and Management. Few majorly used components of this family are:
This family includes all of the components that help in accessing information from the Internet, through various means like Web services, RSS flows, SCP, MOM, Emails, FTP etc. Few of the majorly used components of this family are:
This family, groups together all the components which are dedicated to catch log information and handle Job errors. Following are the majorly used components of this family:
This family gathers different miscellaneous components covering various needs like the creation of sets of dummy data rows, buffering data, loading context variables etc. Few important components of this family are:
This family includes various components which help to sequence or orchestrate tasks and processing Jobs or SubJobs etc. Majorly used components from this family are:
Now that you know the components, let’s quickly take a look at the connectors or the links which help in connecting these components together in a Job.
Talend provides various types of connections to enable the communication between the components:
The Row connection deals with the actual data flow. Following are the types of Row connections supported by Talend:
The Iterate connection is used to perform a loop on files contained in a directory, on rows contained in a file or on the database entries. Unlike other types of connections, the name of this Iterate link is read-only.
The Trigger connection is used to create a dependency between Jobs or SubJobs which are triggered one after the other according to the trigger’s nature. Trigger connections are generalized in two categories:
The Link connection can be used only with the ELT components. It is used to transfer the table schema information to the ELT mapper component in order to be used in specific DB query statements.

Metadata in Talend is the definitional data which basically provides information
about other data that all are managed within Talend Studio. You can find the Metadata in the Repository area of the TOS. In the Repository Metadata, you can store metadata about the various data sources that you may use. This comes in handy while developing any project as you can use these data sources later in your Jobs, just by dragging an object from the repository and dropping it in the workspace.
In the Repository, you can store metadata for various data sources like delimited files, positional file, XML files, database, FTP, Azure, Salesforce etc.
Context variables are the user-defined parameters used by Talend which are passed into a Job at the runtime. These variables may change their values as the Job promotes from Development to Test and Production environment. So, once these variables are set correctly for each environment, you can execute a Job easily in any of these environments. Another use of context variables is to define the values which are commonly used within a project. You can create the context variables in three ways:
These context variables are embedded in the Job and are configured much like any other component parameters in the Context Tab below the Job Designer.
These are created when context variables are used or needed in more than one Job. They are centrally maintained in the repository allowing them generally accessible.
External context variables are those context variables which are held in an external file and loaded into the Studio job at the run-time.
Now, I think you are ready to design your First job in Talend.
In the next section of this Talend tutorial blog, I will show you a step by step demonstration of a simple Talend Job which you can easily execute.
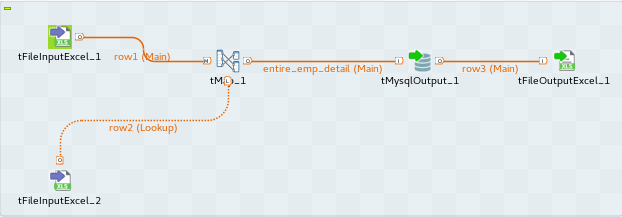
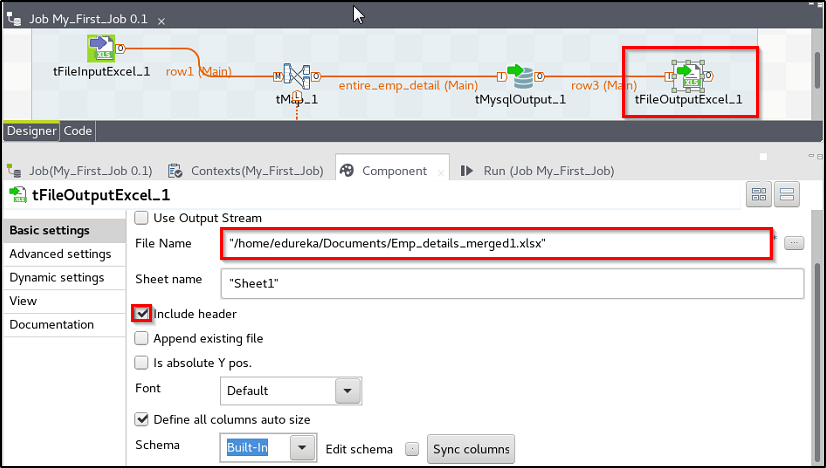
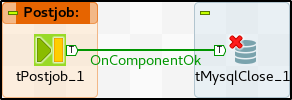
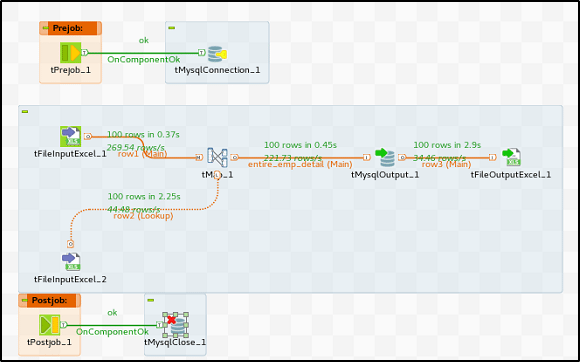
Following is a demo in which first you will be establishing a connection with the database, read data from two different external excel files, merge them and then insert it into the database table. Then in a new excel file write the new table contents. Finally, close the connection once the transfer is complete.
Let’s see how to execute it, step by step:
STEP 1: In this demo, I am using external context file for database details. In order to do so, first, you need to create a context file with all the necessary database details.

STEP 2: Create a new Job. Got to its ‘Contexts’ tab and add the following details:

STEP 3: Now, add a ‘PreJob’ and a ‘tMysqlConnection’ components in the workspace and link them together as shown below. This will establish the connection with the database before the actual Job is executed. Then go to the ‘Component’ tab of ‘tMysqlConnection’ component and add the necessary details:
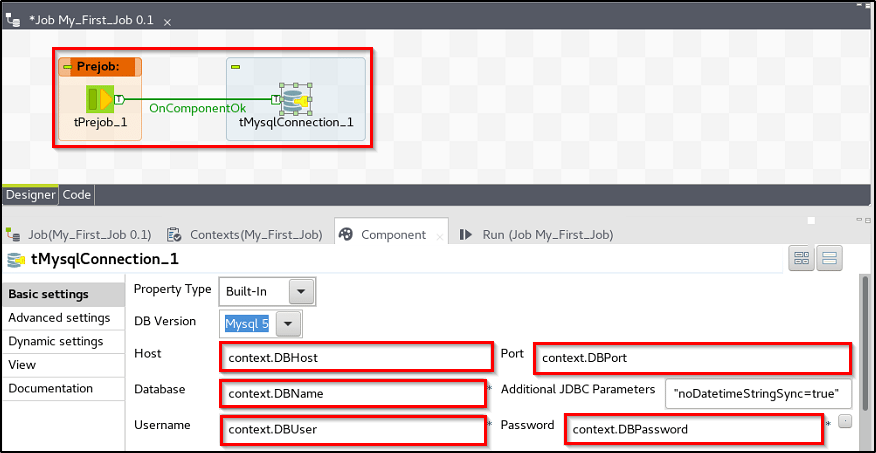
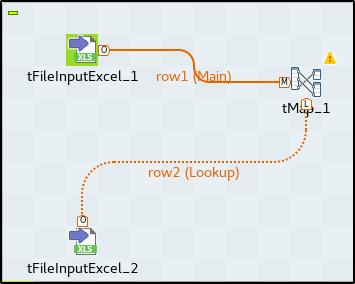
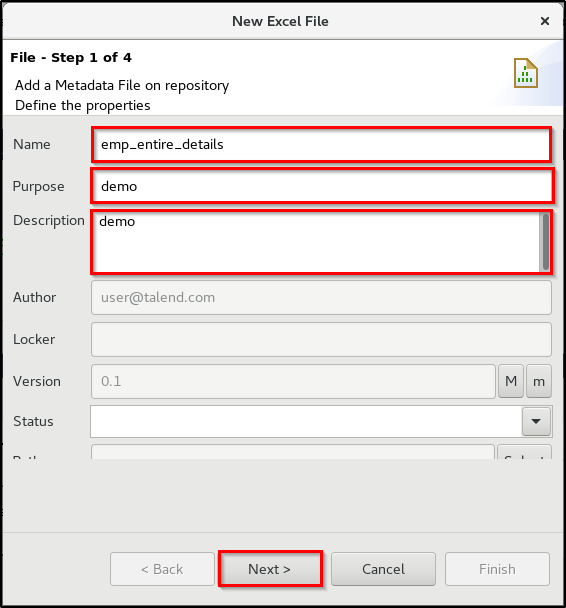
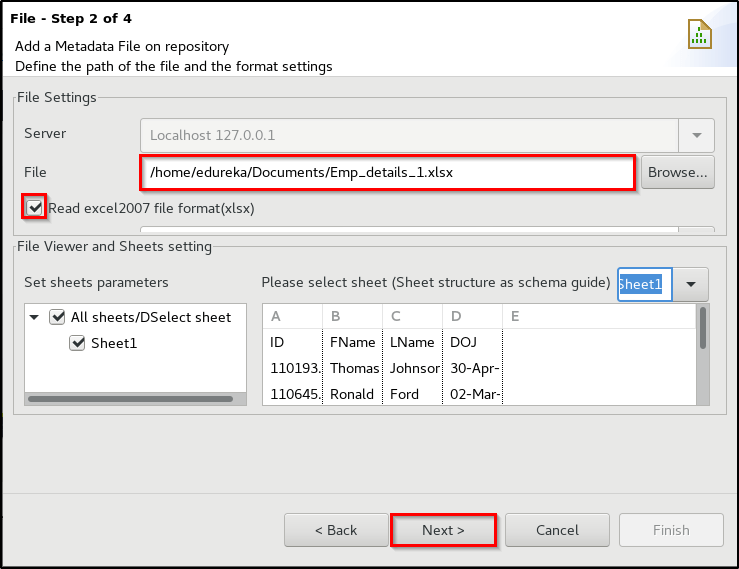
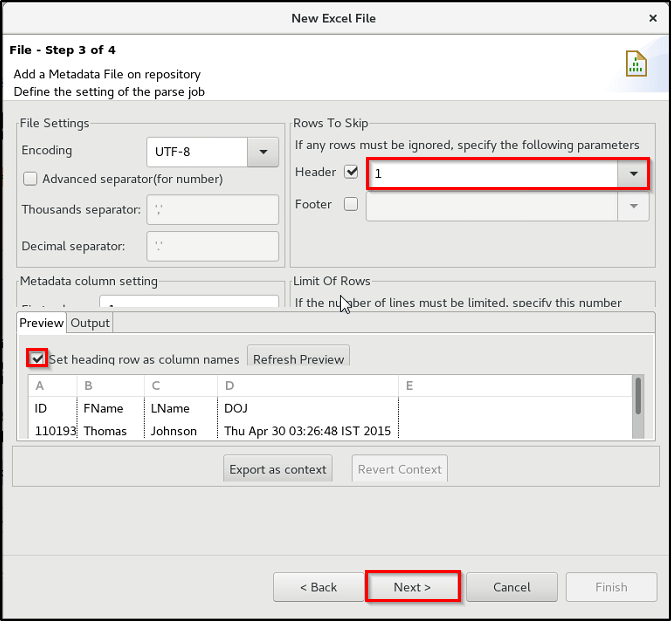
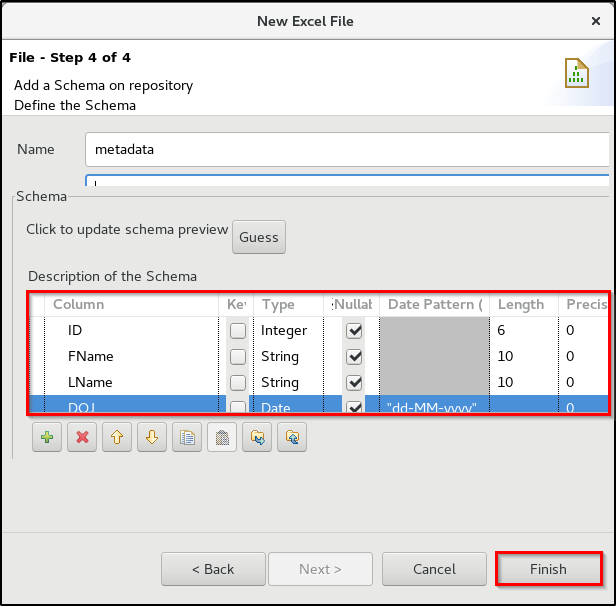
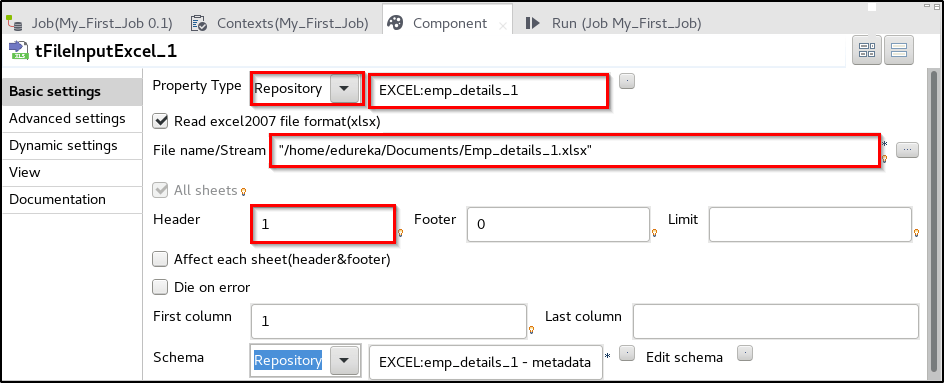
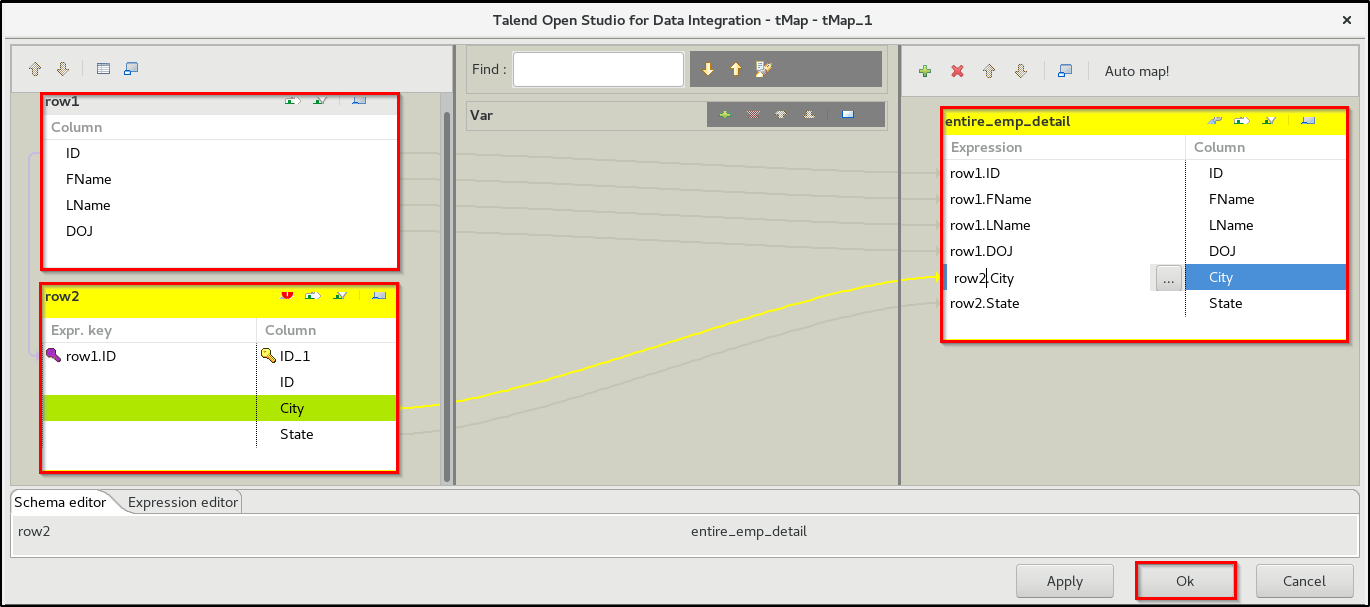
STEP 4: Add two ‘tFileInputExcel’ files and a ‘tMap’ component in the workspace and link them as shown.


 REGISTER FOR FREE WEBINAR
  Thank you for registering Join Edureka Meetup community for 100+ Free Webinars each month JOIN MEETUP GROUP
edureka.co
